
How slip, guards and counters actually work in First Person Boxing: the counter window, head versus body guards, and the habits that land COUNTER HIT.
First Person Boxing Slip and Counter Guide
First Person Boxing names four mechanics in its own description: slip, counter, guards, and stamina. Of those, the slip into counter is the one that decides most fights, because it is the only sequence that both avoids damage and creates it. The game even announces the result in giant letters — COUNTER HIT — so you always know when you got it right.
- Slip — the movement answer to an incoming punch
- Guard — the static answer, split between head and body
- Counter — the damage window that opens after a successful defensive action
- Feedback — the screen prints COUNTER HIT, DIZZY and ROPE A DOPE
- Cost — every defensive action draws on the same stamina bar
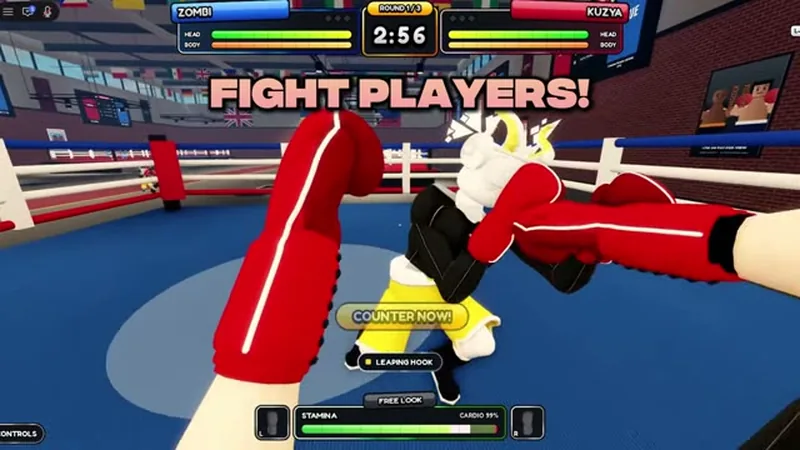
Slip Is Not Block
The official description lists "slip punches" and "different guards to protect your head & body" as separate lines. That separation is the whole defensive design:
- A guard keeps you in place and covers a zone. It is a held state.
- A slip moves you out of the punch's line. It is a timed action.
The reason this matters is what happens next. A guard that works leaves you exactly where the opponent expects you, still on the defensive, still spending stamina. A slip that works leaves you displaced and — crucially — leaves the opponent extended and committed.
That committed opponent is the counter opportunity. This is the entire skill loop: bait a punch, slip it, hit the opening before they recover. Everything else in this guide is detail on top of that sentence.
The Counter Window
The game does not publish frame data, so the honest description of the counter window is behavioural rather than numerical: a counter lands when you hit an opponent during the recovery of their own attack, and the game marks it with COUNTER HIT on screen.
Two practical consequences follow.
Do not counter from a standing start. If you slip and then stop moving, you have spent the timing of the slip without using it. The counter has to be queued during the slip, not after it.
Do not counter everything. Some punches are bait: a short, fast jab recovers quickly, and throwing into that recovery means eating the next punch. The punches worth countering are the committed ones — the heavy, the wide hook, the body shot that pulls the opponent's head off-line.
In first person the glove is already close to your face by the time you see it. The earlier tell is the shoulder and hip rotation that loads the punch. Slip on the rotation, not on the glove, and you gain a full beat of reaction time.
Head Guard and Body Guard
The description's phrase "protect your head & body" implies two guard zones. That creates a rock-paper-scissors problem for anyone who guards by habit:
- Cover high every time and the opponent goes to the body.
- Cover low every time and the opponent comes upstairs.
- Guess wrong and you take the clean shot anyway.
The fix is not faster guessing; it is forcing the opponent to commit first. A half-step back and a high guard invites the body shot, and the body shot is the slower, more committal punch. That is the one you want to slip.
Beginners lose this exchange because they treat the guard button as safety. It is not. A guard is a prediction about where the next punch goes, and a wrong prediction is worse than no guard at all, because it locks you into a stance while the punch arrives somewhere else.
What COUNTER HIT, DIZZY and ROPE A DOPE Mean
The fight HUD prints large status callouts, and reading them is the fastest way to learn the game's rules.
- COUNTER HIT — you landed during the opponent's recovery. This is the positive confirmation that your timing worked.
- DIZZY — a stunned state. A dizzy opponent cannot defend properly, which is the moment to spend your stamina on a real combination rather than a single jab.
- ROPE A DOPE — a style name that also appears as an on-screen callout, associated with a defensive, rope-hugging approach. If you are running it, the callout is your cue that the defensive posture is active.
Do not chase a DIZZY opponent with an empty stamina bar. The stun is short, and the recovery from your own exhaustion is longer.
The Three-Rep Drill That Teaches the Loop
This is the fastest way to move from "I know what a slip is" to "I land counters":
- One AI round, slip only. Throw no punches. Slip every punch you can read. You will eat a lot of them; that is fine. The goal is to stop flinching.
- One AI round, slip into one punch. Every slip gets exactly one counter attempt. No combinations. You are training the queue, not the damage.
- One AI round, full exchange. Slip, counter, then disengage before the stamina bar empties.
Three rounds is about ten minutes. Players who do this learn the loop faster than players who spend an hour in live matches getting knocked out before they can read anything.
Why Counters Beat Combinations
A four-punch combination into a guard costs stamina, deals reduced damage, and leaves you extended. A single counter costs one punch of stamina and deals full damage into an undefended target.
That math is why experienced players look passive. They are not passive; they are waiting for the committed punch. The player throwing volume is the one paying for it.
The stamina guide explains the budget side of this, and the matchup guide explains which archetypes force which committed punches.
If you slip the first punch and the opponent's second punch lands, you spent stamina and took damage. Against a volume puncher, guard the first and slip the committed second. The correct defensive answer depends on the opponent's rhythm, not on a universal rule.
Practising Against Real Opponents
AI practice teaches the loop; live fights teach the read. The difference is that a human will notice your pattern within two exchanges.
Three adjustments that work immediately in live play:
- Change your guard zone after every exchange. If you covered high twice in a row, cover low the third time.
- Throw one committed punch early. A deliberate heavy tells you how the opponent responds — slip, guard, or counter. That answer is the rest of the fight.
- Leave the corner. Rope-adjacent fights favour the pressure player, because your slip has nowhere to go.
Sources and Further Reading
- The official group behind the game: the official Can You Box? group
- Code payouts for extra rolls between practice sessions: Destructoid's First Person Boxing code list
Official source: First Person Boxing on Roblox — the official description states that players slip punches, counter, use different guards for head and body, and manage stamina, and that knockdowns and replays are cinematic.
Frequently Asked Questions
How do you counter in First Person Boxing? Land a punch during the opponent's recovery, usually right after slipping their committed punch. The game confirms it with a COUNTER HIT callout.
Is slipping better than blocking? Slipping creates a counter window and blocking does not. Blocking is safer against fast, low-commitment punches; slipping is better against heavies and body shots.
What does DIZZY mean? It is a stun state. The opponent cannot defend normally, which makes it the right moment for a real combination.
Can I counter without slipping? Yes, any hit during recovery counts. Slipping is simply the most reliable way to create that recovery window.
Why do I run out of stamina while defending? Guards and slips both draw on the same bar. Defending continuously is as expensive as attacking continuously, which is why pacing matters.
More First Person Boxing Guides
First Person Boxing matchup guide: how pressure, evasion, counter and combo playstyles beat each other, and the adjustment that fixes a losing read.
First Person Boxing stamina explained: the fatigue bar, cardio, why getting tired slows you down, and how to pace a fight without gassing out.
A First Person Boxing style tier list built only from confirmed names and rarities, with what each tier means and how to judge a style yourself.